
Blender: renderize objetos e animações - como funciona
Se você criou um belo modelo ou animação no Blender, ele ainda precisa ser renderizado. Renderização é o processo de calcular a imagem ou filme do modelo.
Renderizar objeto com o Blender - as configurações de luz corretas
Antes de poder renderizar uma cena ou objeto no Blender, é necessário definir e ajustar as fontes de luz apropriadas. O Blender possui 5 tipos diferentes de luzes, cada uma com efeitos diferentes na cena e oferecendo opções diferentes. Você adiciona uma nova fonte de luz usando os comandos [Shift] + [A] "e" Lamp ". Em seguida, você pode girar, escalar ou posicioná-las como de costume. Na cena normal, as luzes não são mostradas, cujos efeitos você só pode ver Você também pode encontrar os tipos de luz individuais em nossa galeria de fotos:
- Ponto de luz: O ponto de luz ilumina os arredores da luz em um raio constante, semelhante a uma lâmpada. Nas configurações de luz no lado direito do Blender, você pode definir a cor, o raio (distância) e o brilho da luz.
- Luz do sol: o sol funciona como a luz solar natural: é colocado sobre toda a cena e ilumina todos os objetos com o mesmo brilho. A rotação do objeto altera os lados iluminados dos objetos da cena. Você pode usar o Sun-Light muito bem para criar um brilho geral no jogo.
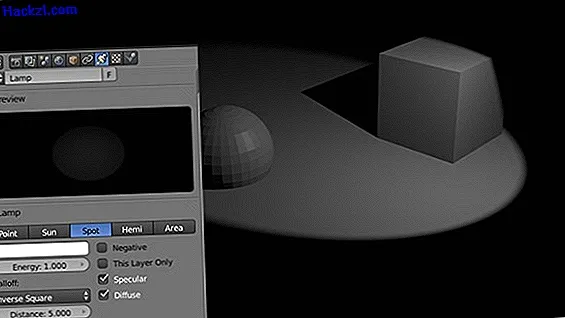
- Foco: o foco pode ser comparado muito bem com uma lanterna. Emite um feixe de luz em uma direção, que se torna mais fraca com maior distância. Com o holofote, você pode especificar a forma e o curso da borda do holofote, além da cor, resistência e alcance nas configurações "Spot-Shape".
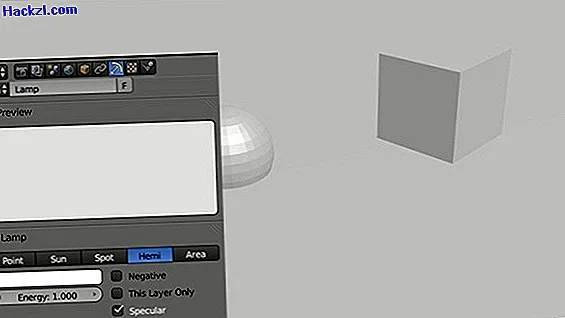
- Hemi-Light: Essa fonte de luz funciona de maneira semelhante ao sol - mas cria um brilho geral ainda mais forte no jogo. Por exemplo, os lados voltados para longe da luz ainda têm um brilho forte e os objetos não podem projetar sombras. Se você deseja renderizar modelos individuais no Blender, o Hemi-Light é ideal.
- Luz da área: semelhante à luz do ponto, a luz da área brilha em um determinado raio ao redor da fonte de luz. No entanto, a luz máxima é distribuída por uma área maior e não é concentrada em um ponto. Você pode alterar essa propagação de luz plana no valor gama nas configurações.
Ajustar as configurações da câmera no Blender
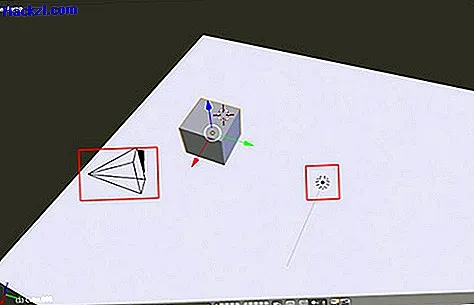
Para que o Blender possa calcular uma imagem dos modelos existentes, uma câmera deve estar disponível na cena. Isso pode ser comparado muito bem com uma câmera normal: todos os objetos no ângulo de visão da câmera são mostrados na imagem renderizada posteriormente. Se você animar uma câmera no Blender, está filmando, por exemplo, fotos chiques de câmera através dos modelos individuais da cena. Se sua cena ainda não contém uma câmera (isso é gerado automaticamente para um novo documento), você pode adicionar uma nova câmera usando os comandos [Shift] + [A] "e" Camera ".
- Se você selecionou a câmera com um clique direito e pressionou o número [0] no teclado numérico, a exibição da cena muda para a perspectiva da câmera. Você pode ver as dimensões da imagem posterior usando um quadro tracejado. Mova e gire a câmera até gostar do recorte.
- Nas configurações da câmera (ícone pequeno da câmera na janela Propriedades), você pode definir a distância mínima e máxima de renderização em "Recorte". Você também pode usar o item Distância focal para especificar o tamanho da área visível - no entanto, valores muito pequenos podem resultar em distorções graves.
- Através do pequeno símbolo do globo, você acessa as configurações mundiais diretamente conectadas à câmera. Aqui você pode definir a cor do fundo de renderização ou ativar a névoa. O item "Oclusão ambiental" é particularmente prático - esse efeito cria uma sombra circundante natural que aprimora graficamente a cena.

Renderizar imagens e filmes
Se você preparou a cena corretamente, pode exportar uma imagem ou um filme com a câmera. Para uma imagem de visualização simples, basta pressionar a tecla [F12] - a imagem é então construída passo a passo. Com [Esc] você retorna à visualização 3D. Selecione o ícone com a câmera pequena em "Preferências". Veja como ajustar as configurações de renderização:
- Com "Resolução", você define a proporção e a resolução da imagem ou filme de renderização. Abaixo, há uma barra de porcentagem: com uma resolução definida de 1280 x 720 e 50%, sua imagem é calculada para o tamanho de 640 x 360. Por exemplo, você pode testar pequenas alterações com baixa resolução.
- Além da resolução, você pode alterar as configurações para a exportação de uma animação: Aqui, por exemplo, o quadro inicial e final e a taxa de quadros do filme são definidos.
- Na área "Saída" abaixo, você especifica o destino da imagem / filme e o formato do arquivo. Depois, você pode calcular a imagem clicando em "Renderizar", uma animação usando o botão "Animação".
- Nota: Uma imagem é renderizada apenas uma vez, mas uma animação deve calcular todos os quadros. Portanto, esse processo pode levar muito tempo.
Galeria de imagens: Visão geral das fontes de luz
A versão do Blender usada na dica prática é 2, 69.
Últimos vídeos
A luz do ponto emite um raio muito pequeno.

A luz solar ilumina a cena uniformemente em todos os lugares, mas os lados dos objetos voltados para longe da luz permanecem escuros.

Os holofotes brilham - como uma lanterna - apenas em uma direção.
A Hemi-Light ilumina a cena uniformemente, como a luz do sol, mas sem sombras e escurecimento dos lados opostos.
A luz da área brilha como a luz pontual em um determinado raio - no entanto, a luz é distribuída por uma área maior e não está concentrada em um ponto.
