
Gimp: quadrinhos em cores - como funciona
Se você deseja colorir rapidamente quadrinhos, caricaturas ou desenhos monocromáticos, tem uma boa ferramenta à mão com o "GIMP". O software de código aberto vem com várias ferramentas para trazer cores à folha. Leia aqui como passar do desenho em preto e branco para a imagem colorida finalizada.
Preparação: O original em preto e branco
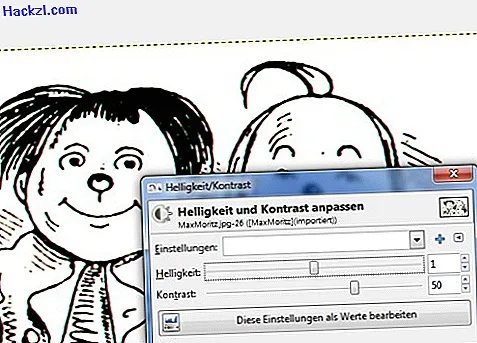
A imagem original deve estar em preto e branco puro. Os desenhos digitalizados geralmente ainda apresentam manchas coloridas. Você pode removê-los aumentando o contraste da imagem. Você pode fazer isso através do menu »Cores« -> »Brilho / contraste« usando o controle deslizante ou pode ajustar os valores das cores através de »Cores« -> »Curvas«.
É assim que a cor entra no quadrinho: Cor em camada por camada com o GIMP
Salve o desenho inicial otimizado no formato GIMP .xcf para poder trabalhar com diferentes níveis da seguinte maneira:
- Primeiro, separe o desenho real do fundo. Para fazer isso, abra o menu "Cores" e selecione "Cores para transparência". Na caixa de diálogo a seguir, confirme se o plano de fundo branco deve ser substituído por transparência.
- Por fim, crie uma nova camada de fundo branco usando a janela da camada ou o item de menu »Camadas« -> »Nova camada«. O GIMP já sugere os valores certos para você.
- Faz sentido criar um nível separado para cada grupo de elementos. Simplesmente duplique a camada transparente quantas vezes for necessário. A maneira mais rápida de fazer isso é usar o atalho do teclado SHIFT + CTRL + D, usado para duplicar a camada ativa (destacada em azul na caixa de diálogo da camada). Para Max e Moritz no exemplo, estes eram quatro níveis: fundo, rosto, cabelo, roupas.

Pegue um balde de tinta e pincele!
- A maneira mais rápida de colorir áreas fechadas, como o plano de fundo ou as faces no exemplo, é com a ferramenta "Preencher" (ícone do balde de tinta). É importante que "Atrás" seja selecionado como modo de preenchimento, para manter os contornos da caricatura ou desenho. Você seleciona a cor clicando nas áreas de cores abaixo da caixa de ferramentas.
- A melhor maneira de colorir áreas menores é usar a ferramenta Pincel. Escolha um tamanho de pincel adequado e verifique se "Atrás" está ativado como modo de cor. Se você trabalha apenas em um nível de cada vez, não importa se a cor fica sem contornos: Com a ferramenta "Borracha", você pode removê-lo rapidamente.
- Se você quiser colorir desenhos ou mangas diferenciados, defina também acentos em áreas de cores como sombras ou efeitos de luz. Para isso existe a ferramenta "Dodge / Postexpose" no GIMP. Você pode encontrá-lo no menu em "Ferramentas" -> "Ferramentas de pintura" ou ativá-lo com o atalho de teclado SHIFT + D.
- Sempre salve seu trabalho finalizado no formato XCF para poder fazer alterações rapidamente mais tarde. O GIMP também suporta todos os formatos de imagem comuns. Se você deseja salvar seu arquivo no formato JPG ou PNG, você deve acessar o item de menu »Arquivo« → »Exportar«.
Max e Moritz foram coloridos com a versão 2.8.6 do GIMP. O GIMP é um programa de edição de imagens gratuito, porém poderoso, que quase chega perto do "Photoshop". Você pode encontrar exemplos de tarefas interessantes que você pode dominar com sucesso com o GIMP em nossas dicas práticas.