Gravar apresentação de slides do iPhoto em CD
Nesta dica prática, mostraremos passo a passo como gravar uma apresentação de slides em CD usando o iPhoto.
Gravar apresentação de slides em CD com o iPhoto
Antes de gravar sua apresentação de slides em CD, você precisa do aplicativo pago iPhoto. Após a instalação, você pode iniciar:
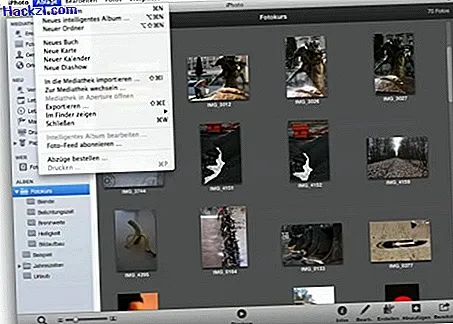
- Quando você inicia o iPhoto, ele pesquisa automaticamente bibliotecas compartilhadas no seu computador. Eles são mostrados à esquerda no menu do iPhoto. Como alternativa, você também pode criar seu próprio álbum manualmente em "Arquivo"> "Novo álbum".
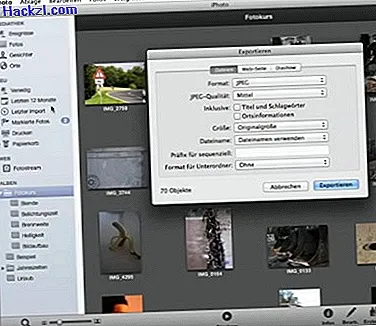
- Depois de fazer sua seleção para a apresentação de slides, clique em "Arquivo"> "Exportar". Uma janela de menu é aberta com a guia "Apresentação de slides". Aqui você pode determinar a ordem da sua apresentação de slides. Na guia "Arquivos", você pode, por exemplo, determinar o tamanho e o formato da imagem. Assim que todas as configurações forem feitas, clique em "Exportar".
- Outra janela é aberta, na qual você pode especificar o local de armazenamento das imagens exportadas. É aconselhável criar uma pasta na mesa, por exemplo, para manter uma visão geral. Em seguida, clique em Criar para iniciar a exportação do iPhoto.
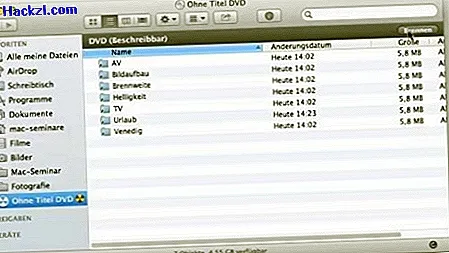
- Insira um DVD / CD em branco na sua unidade e confirme a ação "Open Finder" com "Ok". Em seguida, abra a pasta com as imagens e arraste e solte as fotos no espaço em branco.
- Se você agora abrir o espaço em branco no Finder, o símbolo "Burn" será exibido em uma barra cinza no canto superior direito. Clique nele e determine o nome da apresentação de slides e a velocidade de gravação.
As capturas de tela usadas nas instruções mostram o iPhoto em um Apple iMac. O aplicativo também está disponível para iPhone e iPad. Dica: neste artigo, apresentaremos as funções mais importantes de edição de fotos no iPhoto.
Últimos vídeos
A interface do iPhoto com o menu Arquivo.
A janela do menu da opção "Exportar". Faça aqui várias configurações, como formato e sequência da imagem.
Abra o CD / DVD em branco no Finder.

Arraste e solte as imagens exportadas no espaço em branco.
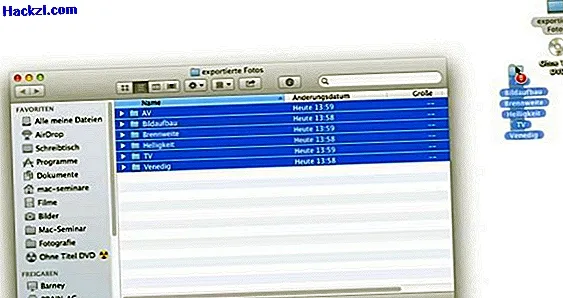
O espaço em branco aberto no Finder com a barra de menus e o símbolo "Burn".